
How do Arm Robots work?
Hey friends, Happy Wednesday!
Let’s look at how arm robots work this week. I aim to write my newsletter issues in a way one can follow them while traveling on a bus, having a coffee, waiting for food, etc. Let's jump in!
How it works: 15-second answer
Let’s take an example of the human hand. Imagine having a motor attached to your shoulder joint, elbow joint, and every other joint in your hands where there is a facilitation for motion. And let’s say I write some software in your brain to command the motors individually to move and reach different angles using a ton of geometry and calculus. This is basically how an arm robot works!
Exciting changes in the Newsletter
I have written the newsletter for 51 Wednesdays without missing one. I had so much fun and hope you did as well! I looked back and here are some changes I’m rolling out. Let’s see how it goes :)
See what’s inside the gadgets from this week. I’m planning to buy them and show them to you in real life. So I’m running an experiment to send out higher-quality newsletter issues on alternate Wednesdays instead of every Wednesday to take more time and effort for each issue **until the end of this year.
Learn how a gadget works in 15 seconds using the “15-second answer” section from this week so you don’t have to necessarily read the entire newsletter if you don’t have time.
Earn rewards by sharing your newsletter referral link at the end of this newsletter with your friends.
Please reply to this email or message me on Twitter sharing your thoughts about this. Would love to hear from you.
Tweet of the week
I’m sharing a cool fact about gadgets and about my newsletter often on Twitter. And here is one of them for you.
How do Arm robots work? Long answer

Figure: One arm with a motor (Bottom-left); Two arms with motors (Bottom-right); 3-pin channel to send commands to the motors (Top)
Step 1: Build the first arm
Let’s make it simple. A servo motor has a shaft that rotates. So by attaching an arm to the end of the shaft, we can rotate the arm and control it using the motor as seen in Figure 1 (Bottom left). Hurray, we have a 1-arm robot.
Step 2: Add the second arm
Now, attach another motor at the end of the first arm. Also, connect an arm to this second motor’s shaft like we did in step 1. You get a 2-arm robot as seen in Figure 1 (Bottom right).
Step 3: How to build the full robot?
Repeat the process for N number of arms. So we now have a motor at the ends of each arm. You can also change the orientation of the motor while attaching it so that the arm can rotate in a different direction. Notice the gif where the axis of the base of the robot is vertical so it can swivel around. However, the other joint axes are horizontal in this example.
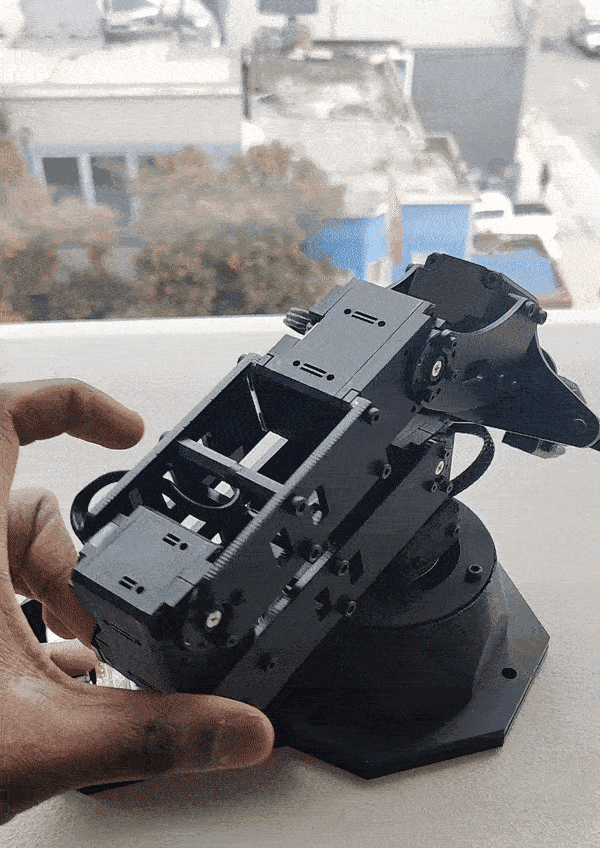
Figure 2: Robot arms rotating about different axis orientations
Step 4: What about the brain of the robot?
A programmable board as seen in Figure 1 (top) is provided for the developer to write the logic using software languages like C++, Python, etc. Using the geometry of the arm, math computations can be done for the end of the arm robot (end-effector) to reach a desired location. (If you’re curious to learn more about it, search for the terms “Forward Kinematics” and “Inverse Kinematics” and you’ll find a ton of information)
Step 5: Commanding the motors after computing
Let’s say we want the arm robot joints to follow a path and that we have computed the series of joint angles that we need to command the motor. How do we send the information to the motors? The microcontroller sends the information through the 3-pin channel as seen in Figure 1 (top).
Question of the week
What are snake robots and why do they even exist? Are they also arm robots? Reply to this email with your thoughts and we can have a discussion. I’ll answer this in the next week’s issue.
Thank you for reading!
Have a nice rest of the week, and take care!
Until next Wednesday,
Chendur