
S2E7: How does an Instant Camera work?
Introduction
The first time I came across an Instant camera was from a movie I watched as a kid, where the protagonist keeps forgetting the people he meets. So he takes their pictures and writes a note at the bottom for his memory. I was fascinated by the technology but had no idea how it worked. Now I know and so do you!
Basically, once you click a picture, a blank-white photo film pops out from a slot (Figure 1. Left). And, it takes a few seconds to generate an image of what you clicked (Figure 1. Right). Let’s see how this magic happens!

Figure 1: Photo film popping out (Left) and Final Image (Right)
Lens pop-out mechanism
Simplified Physics of Image Generation
The stack of 10 photo films (Figure 2. Left) is bunched together in a box and placed inside the rectangular slot (Figure 2. Right) of the Instant Camera. The final image is generated on the individual photo films and it has all the components & chemicals needed for instant photo generation.
When we click a picture using Instant Camera, the outside natural light from the scene we aim at enters the camera lens for a brief period. This light chemically interacts with the sensitive silver-halide crystals packed together very closely on the film. The crystals absorb photons, coming through the lens. Different colors like blue, red, yellow, etc. naturally have different wavelengths. Different wavelengths have different energy so they react differently with the film. Thus, a record of the light is left. Later when the ink is spread over this film, the final image is generated after a chemical reaction.
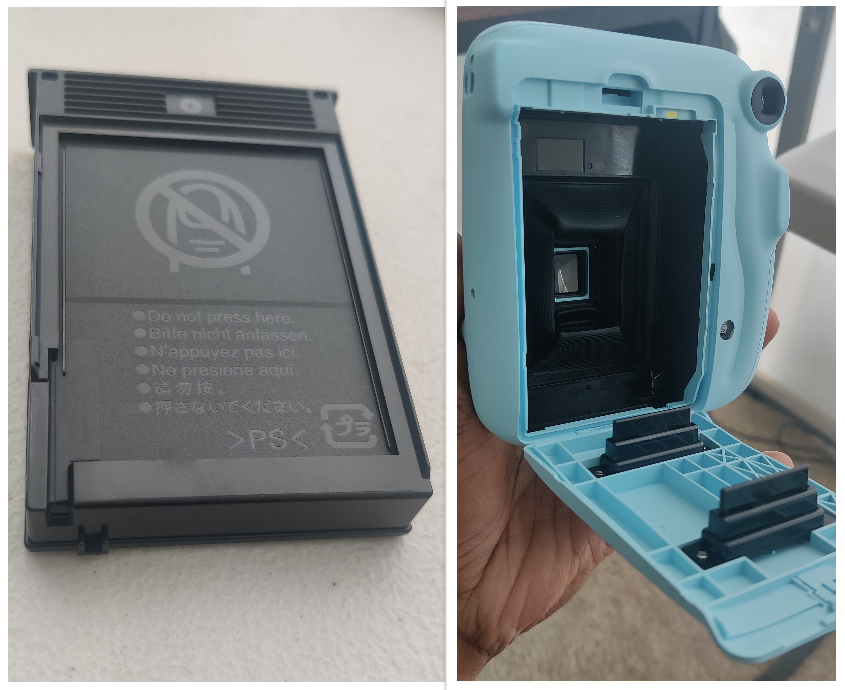
Figure 2: Photo film stack and Instant Camera
Components of a Photo Film
Now, let’s look at the components of an individual photo film. Notice the “Instax Fujifilm” print on the grey section at the photo film’s bottom (Figure 3. Left). It has a white paper-like packet placed within this section (Figure 3. Top). I was curious to see what was inside and cut it open. It had the ink (Figure 3. Bottom) used to generate the image on the photo film.

Figure 3: Components of one photo film
Claw mechanism to push the film
At this point, we have a photo film with a record of the light. But the ink has not yet been applied to the film to generate the image. A metallic claw pushes the topmost photo film in the photo film stack at the small slot available at the left bottom. (Figure 4)

Figure 4: Photo film Stack
The silver lever (marked red in Figure 5) is the claw that slides along the length of the camera by around half an inch to push the photo film and pop it out.

Figure 5: Instant camera with the claw that pushes the photo films out
Motors, Gears, and Roller mechanisms to squeeze and process
Figure 6 is the side view of an Instant camera with the photo coming out from the top and the lens on the right. I have only shown the internal components in this drawing, to better explain the mechanism without confusion.

Figure 6: Mechanism to generate the image on photo film
Once the photo film is exposed to the light, a red lever shaped like a claw (marked in red) slides for about half an inch along the length of the camera and pushes the first photo film from the stack (marked in yellow) linearly.
Between the photo film stack and the rollers marked in brown, the frame of the camera (marked in light blue) has a horizontal protrusion and is in contact with the photo film. This helps in squeezing the ink-filled paper-like pod that comes with each photo film and spreading it on the film. It is because of the ink solution pod attached to one end of each photo film, that they look like a spoon in my drawing.
The pair of rollers with the one on the right being powered, helps in evenly spreading the ink on the film by applying pressure. The attached video zooms in on the silver rollers if you’d like to see how it looks in real life.
Finally, the photo film exits through the slot on the Instant Camera.
Conclusion
In order to create the colors in an image, the film also employs dyes with three different pigments: cyan, magenta, and yellow. When the ink is applied and spread over the exposed photo film, they react with crystals and other layers in the photo film to generate an image.
Thank you for taking the time to read my blog post. If you liked what you read, consider subscribing to my newsletter for exclusive content and understand how a gadget works in only 3 minutes, sent directly to your inbox every Wednesday. We'd love to have you as a part of our community. Also, if you found this post to be informative or enjoyable, please share this with your friends on social media. Thank you!
Reference: Patent US20010021309A1